How a crafter spends Friday night...

No...not on a hot date... well I was hot as my studio has no air conditioning. lol

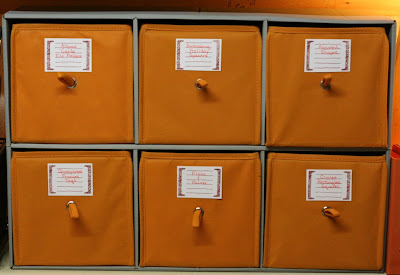
I spent all Friday night and sometime Saturday as well trying to find a place for the assorted scrap and stamp crap we all accumulate: punches, embossing powder, assorted tools etc.

I came across a scrap room on two peas in a bucket where some fantastically clever pea had simply lined the front of her Steralite storage drawers to match her room. WOW what a huge difference this simple touch makes in terms of how they look in a space.


I didn't have to glue the paper in place- there is a little lip on the inside that holds the paper perfectly in place so if i get bored with them I can switch out the paper!

Now the these labels I did spend time on- and they took forever, but I am happy with the way they came out so it was worth it. I don't like my handwriting and I wanted a bolder look than handwriting could provide. So I dug through my rub-on basket and discovered that I had 2 practically full American Crafts Rub-ons (well its actually not surprising that they were practically new or that I had managed to buy two of them). The frame is a Sassafras Lass stamp that I hand cut out. The ink is one of my favorites- Burnt Sienna Palette ink.
Oh the carts themselves I found at Target and were like $15 on sale.

Even my usually non observant husband came in and immediately complimented the way they looked so I guess I did ok :) I still need to figure out what I'm going to put in the last few drawers but I sure I'll come up with something!

Die Cutting Storage

I own a Sizzix Bigshot that I adore! When they were starting to clearance the various old Red Sizzix dies i totally stocked up when they dropped to about $2 a die as I LOVE that they cut through chipboard like buttah!

I found this storage unit on clearance at KMart about a year ago for less than $5.


As you can see I still haven't gotten around to painting the gray part white but- life goes on. I did however finally figure out a workable organization (I think) and finally got around to adding basic labels to the drawers.


I am one of these people that gets paralyzed into in-action when I can't do something perfectly. I'm trying to get over it and just get it done instead of not doing it all.

I also store my Nestabilities and my Cuttlebug embossing folders right next to this unit.
This is just a super basic CD holder that Joann's was selling during their "back to school" line last year. The fabric drawers perfectly compliment the Sizzix unit, I'm not so keen on the frame part but I'll deal for now.

So there you have it- super basic but very functional.

Sneak Peak For July's Stamp Club Workshop


Here is a quick sneak peak of the project we will be making at our July Stamp club!

Stampin Up Color Matching Made Easy

I know for many people finding colors that match among what they have can be a real nightmare. Trying to pull a card together can be like pulling teeth.

I stumbled across this fantastic site SU COLOR COMBOS You can pick anywhere from one to four Stampin Up colors and it will suggest other Stampin Up colors that will match. It also has a Surprise Me! option where it will pick 5 coordinating colors at random. I got some wonderful pallets this way that I never would have envisioned on my one!

This way you can slowly add to your collection- or be more creative with what you might already own. I love how it combines from outside a color family for even more options! Here's just one of my favorites from the surprise me option- perfect for little girl cards and summer cards and mother's day cards.....


So what are you waiting for- go and play!

Chipboard Storage

I at last have a way to store my chipboard. Well my alpha's at least!


Ive seen several people use these cheap shoe holders to store punches but I had too many and no way to attach something that heavy to my concrete walls.

Light-weight chipboard though- no problem! I even had orange chipboard letters from Lil Davis from like a gazillion years ago I had never used! They were perfect to label each pocket!

It took me a while to sort them all into their little pockets and I had to double up on the last 4 letters- but I am so happy with the way they turned out. With the pockets being clear- it is an absolute breeze finding just the right letter.


And the pockets are large enough to get my hand in there and sort of shuffle them about without having to pull them all out to browse. I am finding that I am using them so much more now that I can just glance up and be reminded- hey I have a TON of chipboard! Now I just need to figure out what to do with my shapes and numbers (I'm out of wall space so I can't just add a second shoe holder). Ahhh the dilemmas of being in a basement :( So back to the drawing board!

The Artist

What is an artist?
Websters dictionary defines it as:
1 a obsolete : one skilled or versed in learned arts b archaic : physician c archaic : artisan
2 a: one who professes and practices an imaginative art b: a person skilled in one of the fine arts
3
: a skilled performer; especially : artiste
4
: one who is adept at something artist> artist>

To me an artist is someone like my grandmother. Actually she was an Artist. You could hear her add the Capital "A" when she said it. And she was right.

My grandmother is my hero. Possessing infinite strength and a faith and self confidence that seemed almost impossible. She knew exactly where she stood on every issue and she KNEW she was right because as she would remind you "I am an Artist!".

She also was an artistic genius and worked in many mediums. Sculpture, painting, drawing, she even sewed and did crochet (although for most of her life this was out of need rather than want). As she would quickly tell you when you admired her work- she was a straight blue ribbon prize winner. Winning first place in every exhibition and contest she ever entered. She was even approached by some museums to display some of her work.

From the time I was a little more than a baby, my brother and I had "art lessons" when we spent our summers with her. We painted and even got to do some ceramics at the senior center she worked at. Its from her I learned without being taught the importance of color, composition, balance, perspective etc... All the fundamentals for good art. At the time it seemed more like play than work and I think it was this early exposure that instilled a profound love of being creative that still is a tremendous passion of mine.

Every single time I sit down and do something creative I am reminded of her. I feel her hands carefully guiding mine the same way they did when I was 3 or 4. I wish I had told her just how much I appreciated this tremendous gift she bestowed upon me. All I can do now is dedicate my work to her as I still stand humbled in her artistic shadow.


Delight in the Small Things In Life!


It has a bird. It has orange. It was on clearance.
Nirvana.

How to store an Art Store's worth of assorted markers and pencils....

My beloved grandmother was an AMAZING artist and I have been coloring and painting since before I could read or write. So over the years I have accumulated a ton of assorted colored pencils and markers (and paint and various other art supplies and crayons etc....)

As my collection grew I struggled with how to store them in such a way that they were easily accessible and still relatively portable now that I go to crops and host Stampin Up workshops. Added to this was I now had some markers that did better stored horizontally where as in the past most of my storage attempts were vertical.

Then one day on the way to a crop I threw a handful of my Copics into a clear Stampin Up box that comes with ever stamp set and Voila! A solution is born!

The second to largest of their clear cases are PERFECT if you need to store longer markers like Tombow and for new Prismacolor pencils. As you can see Im a bit of a glutton when it comes to coloring implements so some colors-like red, green and blue take up 2 cases. But it's still super easy to drop them into my tote bag and go.

The cases are sitting on a shoe shelf I picked up at Target for $12 or so and it sits on my desktop. This way everything is super close at hand and its very easy to find just the right color for a project once I use my color guide I will showcase tomorrow.

Better still - the cases are in essence free since I had been holding on to them knowing I would eventually find a use for them. Cheap and green! My favorite combination!

I LOVE My unmounted Stamps!

So besides being a total Ribbon-a-holic, I am a sucker for stamps. All stamps. Clear, Cling and good old fashioned rubber. My collection got so large that I HAD to go unmounted just to try to save space-plus with the addition of clear stamps there was no good way for me to store them all together until I put them in binders.

Not only did this save a tremendous amount of room it also made finding just the right stamp SOOOO much easier! Now All My birthday stamps are in one spot- no more having to remember that there was a sentiment I liked in set A and an image I wanted to use from set B.

All like images are stored together. Everything that says Happy Birthday on one page (well, ok... 3 pages...) All cake images on another etc...

I find I use my stamps much more and even found some new favorites that I had completely forgotten about. And its much easier for friends who come scrap with me to find stuff too!

SO here are my binders... I needed to split my fauna binder in 2 as one binder is almost completely full of various bird images, and I just haven't had time to decorate it yet.

And here you can see one of my pages of owl stamps as an example of what a typical page looks like. The stamps are adhered to an overhead transparency and slid into a page protector. Then I added a plain white piece of cardstock so the pages didn't "bleed" together. The clear and cling stamps stick naturally to the transparency. For the rubber stamps if they came mounted on wood blocks I heated them in the microwave for a few seconds to heat the glue-then just pulled the rubber off the foam and block. I then painted a little Aileen's Tack it Over and Over adhesive that forms a temporary bond that works perfectly for this application. A bottle runs about $4 and I'm still on my first bottle after un-mounting hundreds of stamps.


So there you have it my take on unmounted stamp storage!

My Ghetto Fabulous Clip-It Up

When I first saw the clip it up I thought it was the perfect product. Then I saw the price tag. And the footprint. And thought well shucks I don't have any spare counter space. So low and behold several people came up with ingenious work-arounds to this solution using various easy to find and cheap products like curtain rods and rings.

I thought my problem was solved until I started counting how many things I wanted to hang and how much even the cheapest Walmart curtain rings ran. So I had to improvise and came up with this Ghetto Fabulous version.

The rod is the Bygel rod from Ikea for $2.99 and several boxes of jumbo paper clips. Total cost for my solution under $6! That's less than 1/10th the price of just the base clip it up!

I apologize in advance for the poor quality photos but the lighting in my little closet isn't the greatest.


In Memory of my Dad

Father's Day.

I spent most of the day feeling sad as I miss my dad something fierce. We didn't always get along (too much a like I think) but I always new how much he loved me and hopefully he knew how much I cherished him.

And so I just wanted to take a moment to publicly thank him for being a wonderful dad, and to say I miss you!

A Day at the Zoo

I went on a photography field trip with my good buddy Virginia so I had a chance to start practicing with my zoom lens my husband got my for Christmas. This is the first real opportunity Ive had to use it and was pretty happy with the results. Now I just need to learn to hold my arms steadier!


And my absolute favorite- Ive titled it "Yo baby Whaz Up?"